In eCognition it is possible to write applications using Python. The algorithm 'python script' allows the processing of Python files (*.py ) or the insertion of Python scripts directly into the algorithm. This chapter is related to eCognition's embedded Python API.
Note - An external eCognition API is provided as python wheel package accessible from python program by installing the ecognitionapi package using the appropriate wheel package. See User Guide > Python Package Documentation .
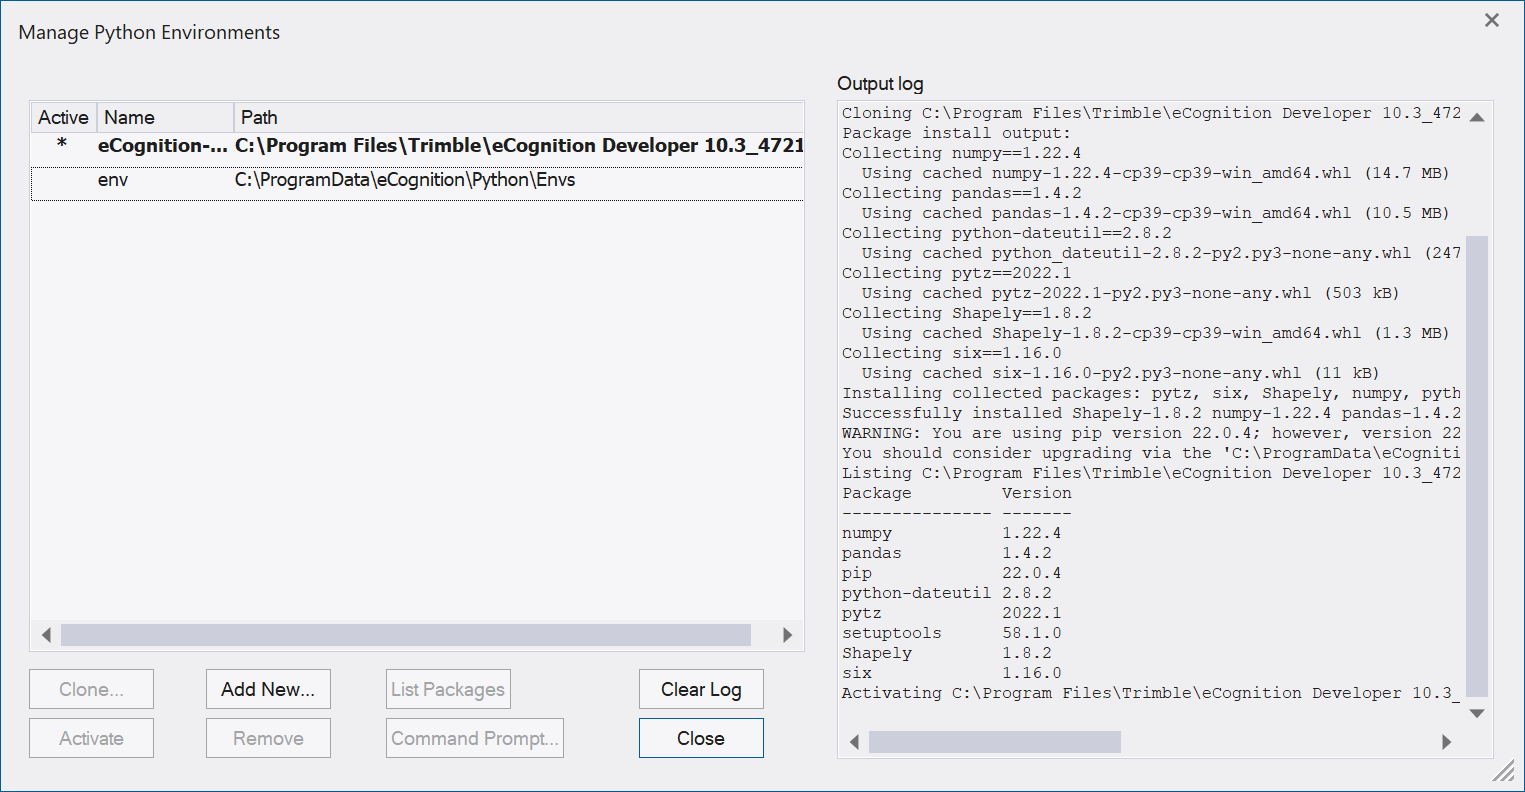
Manage Python Environments
Select Tools > Manage Python Environments to clone existing, add new, edit, or remove Python environments.
-
Clone... - creates a copy of the selected environment and opens the Clone Environment dialog where you can set the environment's name and path.
The default environment eCognition-env is installed on activation of the check box Python Support during setup (see chapter Prerequisite above), containing the default Python libraries included in eCognition.
-
Activate - activates the selected environment (active *). The active environment is used to run any Python functionality executed in eCognition.
To change the active environment, select the environment and click Activate. (If you change the active environment, a restart of eCognition is only necessary, if the python interpreter was already in use.) -
Add New... - creates a new, empty environment. If a Requirements file is specified, packages from this file are installed. Note that Numpy, pandas, and shapely packages are always required and need to be installed before an environment can be activated in eCognition. The requirements file stores the required python packages and optionally their versions. (see https://pip.pypa.io/en/stable/reference/requirements-file-format/)
In the Clone/Add Environment dialog you can set the environment's Name and path. By default, a new or cloned environment is created in the folder C:\ProgramData\eCognition\Python\Envs. To create the environment in a different folder, click the Folder browse button.
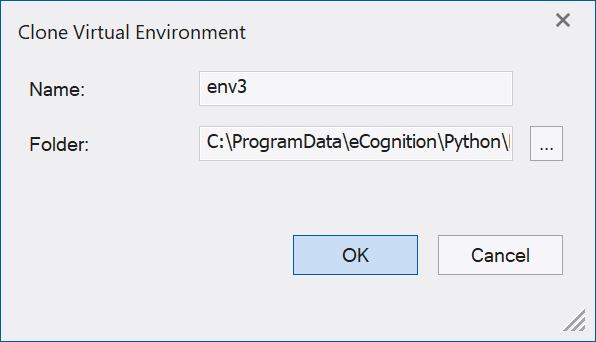
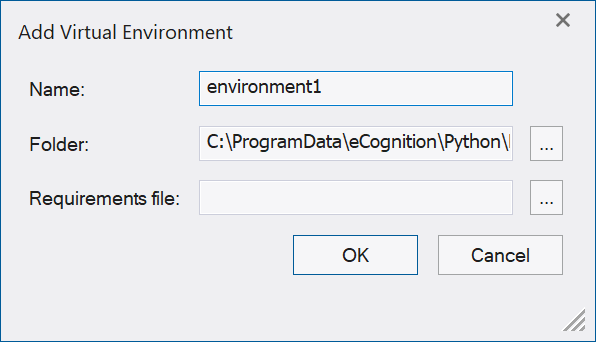
Clone Virtual Environment/ Add Virtual Environment dialog -
Remove - deletes the selected environment. Note that the default environment eCognition-env and the currently active environment can not be removed.
-
List Packages... - Select an environment and click this button to obtain a list of all Python packages and their versions installed for the selected environment in the output log.
-
Command prompt ... - Opens the command line interpreter application to enter and execute commands, install packages or obtain information for the selected environment (not the active, but the selected environment). The command prompt opens based on the selected environment, for example:
(env1) C:\Program Files\Trimble\eCognition Developer 10.5\bin>.
-
Clear Log - Deletes all log entries of the output log.
Alternatively, you can open the context menu by right-click on an environment to choose among the functionality Clone, Activate, Remove, List Packages and Command prompt.
Input to and output from python
The following input and output is supported:
-
Raster layers
-
Variables - double or string (variables that are returned to eCognition must be of floating or integer type)
-
Regions
-
Arrays - double or string (output array elements have to be of the same type, e.g. only double or only string)
-
Point clouds (multiple point clouds can be passed to the script, but cannot iterate over multiple point clouds at the same time)
-
Vectors (attribute elements of the same column cannot have different data type, vector geometries must be of one type within one vector object)
Debugging python code in eCognition Developer
Using an external debugger for python scripts the following requirements have to be fulfilled:
-
supported for python files (and not for inline scripts)
-
only Windows OS is supported
-
Integrated development environment (IDE) that supports debugpy remote debugger is required, for example: Visual Studio Code (VS Code) with Python extension or Visual Studio
In this documentation, we provide an example how to attach a debugger using Visual Studio Code (VS Code).
Integrated development environment (IDE) setup
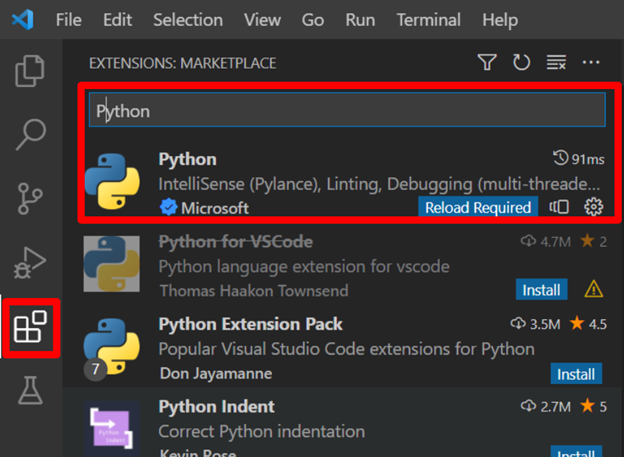
First, you need to install the Python extension in VS Code.
-
Go to Extensions and search for Python extensions in the marketplace.
-
Install the extension.
-
After installing the extension, you need to create a launch.json file.
IntelliSense
eCognitions python module supports IntelliSense features. See the example below how to enable it in VS Code.
-
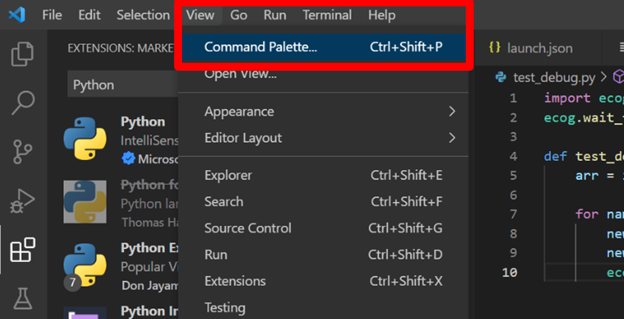
Go to the main menu View > Command Palette...
-
Start searching for Python: Select interpreter.
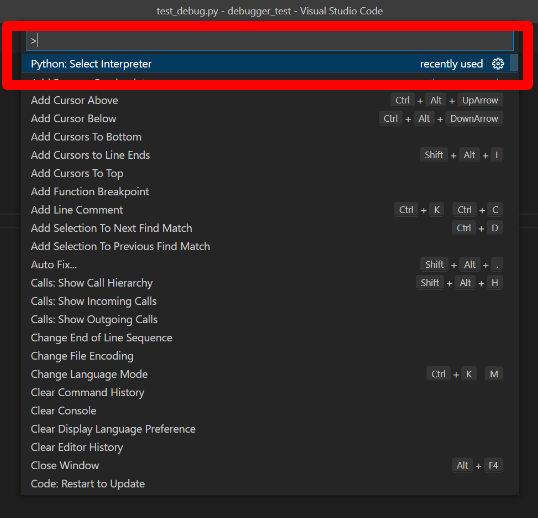
Enter the correct interpreter path from your eCognition installation. This path should lead to the python.exe file of the current active eCognition python environment.
The default environment with the preinstalled packages is saved in (default location of python.exe):
C:\Program Files\Trimble\eCognition Developer 10.5\bin\Python\eCognition-env\Scripts
If you are using custom python environments, they are, by default, saved in:
C:\ProgramData\eCognition\Python\Envs
Now your IntelliSense should work when typing 'ecog.' in VS Code IDE.
Debugging
Start debugging
To start a debugging session uncomment the function call below (or if you are writing the script from scratch, add the following line to your Python script):
ecog.wait_for_debugger(port=5678)
It is necessary to open the folder that contains the file for debugging. Additionally, the .vscode folder needs to be located in the root of the opened folder, containing the launch.json file.
Any open port can be used here, but then the same number must be used in the script function
ecog.wait_for_debugger(port=5678)
In the launch.json file specify the host and the port:
-
'host' is localhost
-
'port' is 5678
Please find the sample content of launch.json below (copy & paste enabled):
{
    // Use IntelliSense to learn about possible attributes.
    // Hover to view descriptions of existing attributes.
    // More information: https://go.microsoft.com/fwlink/?linkid=830387
    "version": "0.2.0",
    "configurations": [
        {
            "name": "Python: Remote Attach",
            "type": "python",
            "request": "attach",
            "connect": {
                "host": "localhost",
                "port": 5678
            }


        }
    ]
}
Example - In the figure below (Start debugging in VS Code - left part) you can see the following structure: DEBUGGER_TEST is the debugging folder, that contains the .vscode folder with the launch.json file below.

-
Open the same Python file that you run in eCognition Developer and set a breakpoint.
-
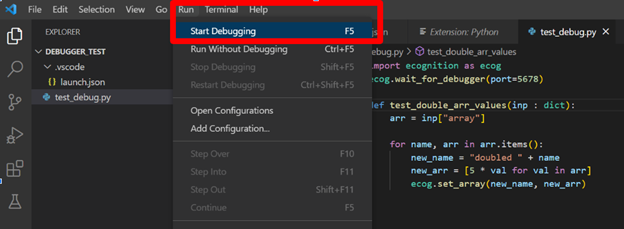
In eCognition, execute the algorithm 'python script' with the Python file in it. The method wait_for_debugger will block the code execution and wait for a debugger to connect.
Now you can switch back to VS Code and start a Debugging session (F5).
Stop debugging
After you are finished developing and debugging your python code, comment out the following line in the python script:
#ecog.wait_for_debugger(port=5678)
Execute algorithm 'python script'
Save the script and disconnect (Shift+F5) in VS Code. You can now execute the algorithm 'python script' in eCognition Developer.
To ensure transferability of your rule set it is recommended to use the 'inline script' mode of the algorithm 'python script' for the final rule set.
Script Examples 
These script examples can be used in the algorithm 'python script'.
Example 1 - Layer Normalization
This example normalizes all raster layers by dividing each value by 255. For each layer that is passed a new normalized layer is created.
import ecognition as ecog

def image_normalization(input_dict):
  layers = input_dict["raster"]

  for name, raster in layers.items():
      if isinstance(raster, ecog.Raster):
        new_name = "Normalized " + name
        new_layer_data = raster.read_data() / 255.0
        new_raster = ecog.Raster.create_raster(new_name, new_layer_data)
        new_raster.close()
Example 2 - Variable Sum
The following example sums all process variables that are passed and creates a new variable “var_sum” that will contain the sum.
import ecognition as ecog

def sum_variables(input_dict):
  variables = input_dict["variable"]
  res = 0

  for var in variables.values():
    if not isinstance(var, str):
      res += var

  ecog.set_variable("var_sum", res)
Example 3 - Variable Concatenation
The following example concatenates all variables that are passed and creates a new variable “var_concat_string” that will contain the concatenated string.
import ecognition as ecog

def concat_string(input_dict):
  variables = input_dict["variable"]
  res = ""

  for var in variables.values():
    if isinstance(var, str):
      res += var

  ecog.set_variable("var_concat_string", res)
Example 4 - Double Array Elements
This example doubles the elements in all arrays that are passed.
import ecognition as ecog

def double_arr_values(input_dict):
  arr = input_dict["array"]

  for name, arr in arr.items():
    new_name = "doubled " + name
    new_arr = [2 * val for val in arr]
    ecog.set_array(new_name, new_arr)
Example 5 - Create Raster Layer
The following example creates a new raster layer. The size of the raster layer will be equal to the size of the region “reg_image_size”, while the values will be equal to the value of the variable “var_image_value”.
import ecognition as ecog
import numpy as np

def create_image(input_dict):
  image_val = input_dict["variable"]["var_image_value"]
  region = input_dict["region"]["reg_image_size"]

  sz_x = int(region[1][0])
  sz_y = int(region[1][1])

  img = np.full((sz_y, sz_x), image_val, dtype=np.float32)
  raster = ecog.Raster.create_raster("python_image", np.dtype(np.float32))
  raster.write_data(img)
  raster.close()
Example 6 - Create Point Vector Layer
This example creates a new vector layer called “point_vector_layer”. The layer will contain 3 points, each with a single vector attribute “point_id”.
import ecognition as ecog
import pandas as pd
from shapely.geometry import Point

def create_vector(input_dict):
  vector_data = pd.DataFrame(data={
    "point_id": [0, 1, 2],
    "geometry": [Point(17.2, 13), Point(18, 20.5), Point(15.5, 17)],
  })

  ecog.Vector.create_vector("point_vector_layer", "Point", vector_data)
Example 7 - Split Point Cloud Layer
This script creates two new point cloud layers from one point cloud layer “Layer 1”. The new point cloud layers are called “class_0” and “class_5”. The layer “class_0” will contain only the points that have a classification equal to 0, while the layer “class_5” will have points that have a classification equal to 5.
import ecognition as ecog
import numpy as np

def split_pc(input_dict):
  pc = input_dict["point_cloud"]["Layer 1"]

  cls_0 = ecog.PointCloud.create_point_cloud("class_0")
  cls_5 = ecog.PointCloud.create_point_cloud("class_5")

  for chunk in pc.get_chunk_iterator(points_in_chunk=10000):
    cls_0_indices = np.where(chunk.classification == 0)[0]
    cls_5_indices = np.where(chunk.classification == 5)[0]

    cls_0.add_points(
      chunk.x[cls_0_indices],
      chunk.y[cls_0_indices],
      chunk.z[cls_0_indices],
      chunk.intensity[cls_0_indices],
      chunk.red[cls_0_indices],
      chunk.green[cls_0_indices],
      chunk.blue[cls_0_indices],
      np.full(len(cls_0_indices), 0, dtype=np.uint8),
    )

    cls_5.add_points(
      chunk.x[cls_5_indices],
      chunk.y[cls_5_indices],
      chunk.z[cls_5_indices],
      chunk.intensity[cls_5_indices],
      chunk.red[cls_5_indices],
      chunk.green[cls_5_indices],
      chunk.blue[cls_5_indices],
      np.full(len(cls_5_indices), 5, dtype=np.uint8),
    )

  cls_0.close()
  cls_5.close()
Example 8 - Iterate and Classify Image Objects
This example shows how to iterate through all image objects and how to classify them.
In case ProcessContext.get_image_object_iterator() is used, the python script requires the domain 'image object level'.
import ecognition as ecog

def classify_objects():
    obj_iter = ecog.ProcessContext.get_image_object_iterator()
    for obj in obj_iter:
        obj.set_classification("water", 1.0)
Example 9 - Access to Image Objects and Usage of Object Methods
This example shows how to get the first image object from the iterator and use all the available methods for it.
In case ProcessContext.get_image_object_iterator() is used, the python script requires the domain 'image object level'.
import ecognition as ecog

def image_object_operations():
    obj = next(ecog.ProcessContext.get_image_object_iterator())
    clss = obj.get_classification()
    obj.set_classification("water", 1.0)
    pxl_cnt = obj.get_pixel_count()
    border_length = obj.get_border_length()
    innr_pxl = obj.get_inner_pixel()
    b_box = obj.get_bounding_box()
    nbrs_lst = obj.get_neighbours()
    obj_mask = obj.get_mask()
    # Print the image object information
    ecog.write_message(str(obj), True)
Example 10 - Access to Feature Values
This example shows how to get the value of an eCognition feature.
import ecognition as ecog

def feature_operations(input_dict):
    scene_pixel_size = input_dict["feature"]["Scene pixel size"]
    # ecognition.Feature
    brightness = input_dict["feature"]["Brightness"]
    # ecognition.Feature
    #Calculate the scene pixel size
    pxl_size = scene_pixel_size.get_map_feature_val()
    #Calculate the brightness for the first Image Object
    obj_iter = ecog.ProcessContext.get_image_object_iterator()
    obj = next(obj_iter)
    brght_val = brightness.get_object_feature_val(obj)
Example 11 - Deep learning model inference examples
This example shows how DL models that require custom preprocessing / postprocessing can be used via python script using DLInferenceSession. First a model needs to be loaded in eCognition using the load 2D deep learning model process. Afterwards that model can be used in python script.
import ecognition as ecog
import numpy as np

def function(input_dict):
    layer_1 = input_dict["raster"]["Layer 1"].read_data()
    layer_2 = input_dict["raster"]["Layer 2"].read_data()
    layer_3 = input_dict["raster"]["Layer 3"].read_data()

    image = np.stack([layer_1, layer_2, layer_3], axis=-1)
    preprocessed_image = preprocess(image)

    sess = ecog.DLInferenceSession.create_dl_inference_session()

    output = sess.run({"image": preprocessed_image}, ["output_name"])[0]
    postprocessed_output = postprocess(output)

    output_layer = ecog.Raster.create_raster("Result", postprocessed_output)
    output_layer.close()
Example 12 - Project Point Cloud Points to Camera Frame
This example shows how point cloud points can be projected onto a camera frame. Prerequisite is an eCognition project with a camera view dataset. This particular example takes the xyz coordinates of the first chunk, and projects those points onto the 1st frame.
import ecognition as ecog

def function(input_dict):
    point_cloud = input_dict["point_cloud"]["Layer 1"]

    point_cloud_itr = point_cloud.get_chunk_iterator()
    chunk = next(point_cloud_itr)
    pc_xyz = np.column_stack(
        (chunk.x, chunk.y, chunk.z)
    )

    pixel_pts, indices = point_cloud.point_coordinate_to_pixel(pc_xyz, 0)
    projected_xyz = pc_xyz[indices]
For more information see also:
Installation Guide > Windows > Python Installation - installation and setup
Reference Book > Algorithms and Processes > Miscellaneous > Python Script - description algorithm and its parameters
Reference Book > Algorithms and Processes > Miscellaneous > Python API Reference - reference for each class, properties, and methods
